🖼️ Backgrounds
🏟️ Venues
Section titled “🏟️ Venues”Installing a Venue
Section titled “Installing a Venue”To install a new venue:
- Open the Settings menu
- Click on the General tab
- In the Venues/Backgrounds section, click on Open Backgrounds/Venue Folder
- Copy your venue files into that folder, then restart YARG.
Creating a Venue
Section titled “Creating a Venue”First Steps
Section titled “First Steps”Before you start creating your venues you need to follow a few steps, you need to have the project in your computer so you can export and test your venue.
Building the Project
Section titled “Building the Project”- Make sure you have the latest version of Blender installed. This is for loading models, even if you don’t plan on editing them.
- Make sure you have Python (3.10) or greater installed. Be sure it is added to system path. This is required to download dependencies.
- Clone the repository. If you don’t know how to do this:
- Download Git. Be sure it is added to system path.
- Open the command prompt in the directory you want to store the repository.
- Type in
git clone https://github.com/YARC-Official/YARG.git. - Install Unity Hub and Unity
2021.3.21f1(LTS). - Download and install Unity Hub.
- Sign-in/create an account with a personal license (free).
- In Unity Hub, click on “Install Editor” and select
2021.3.21f1(LTS). It may be favourable to unselect Visual Studio if you are not using it. - Click “Install”
- Open the command prompt at the root of the repo, and type in:
pip install requestspython InstallLibraries/install.py. This may take a bit. Wait for the command prompt to say “Done!” before closing. This installs all of the needed dependencies for you.- Open the project in Unity (select “Open” and select YARG’s repo’s folder).
- Load in without entering safe mode. Click “Ignore”.
- (You may need to) click on
NuGeton the menu bar, then click onRestore Packages.
Building a Venue
Section titled “Building a Venue”Inside the project we have a folder Venue that contains a scene called VenueCreation this scene can be used as template for any scene you want, we recommend duplicating it and changing according to your needs.
Starting
Section titled “Starting”As soon as you open the scene you’ll notice a few layers, you need to place your venue assets inside Stage that is located inside the Venue group
Lights
Section titled “Lights”To add reactive lights to your venue you can add any default lights from Unity, go to the Inspector, add a new component called Venue Light
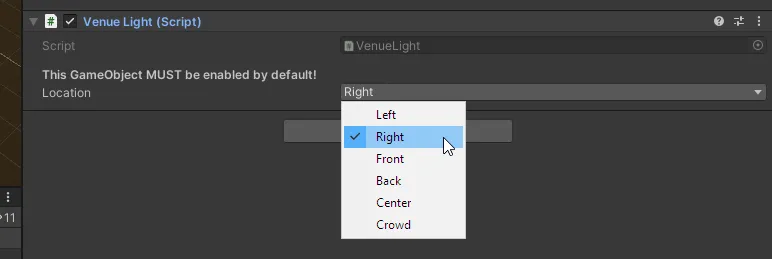
In the new component you can select the type of light you want, we currently have this options:
- Left
- Right
- Front
- Back
- Center
- Crowd
Exporting
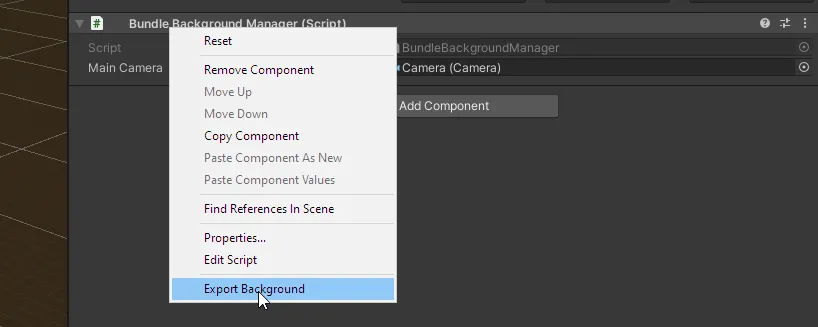
Section titled “Exporting”To export your Venue you need to select the Venue layer, right click the Bundle Backgroud Manager (Script) in the Inspector sidebar and select Export Background
Useful Links
Section titled “Useful Links”🎥 Video
Section titled “🎥 Video”YARG supports video playback during gameplay. Videos are played per song if an applicable video is present in an applicable song’s storage folder. Random, non-specific videos can serve as video backgrounds if stored in the “venues” folder. This folder can be accessed by visiting Settings > General > Open Backgrounds/Venue Folder.
To successfully see video playback during gameplay:
-
The video must be in .mp4 or .webm format. Note that the Unity video player on Linux does not support .mp4; use VP8 .webm instead.
-
Per song videos must be stored in a song’s folder and labeled as “video” or “bg” or “background”
-
As of update v0.11.1, CON files must be in extracted (“ex-con”) form in order to be used for video playback.
-
Ensure that per-song backgrounds are not disabled in Settings / General / Venues/Backgrounds.
-
To help synchronize the video with the song, you can add a video_start_time parameter (in milliseconds) to the song.ini file: negative values delay the video, while positive values seek the video to the time where the song starts. As an example, this jumps to 4.5 seconds within the video when the song audio starts:
video_start_time=4500
Editing Tips
Section titled “Editing Tips”Useful Links
Section titled “Useful Links”| Name | Description | Link |
|---|---|---|
| JDownloader | Used to download the video. It can get the best resolution videos and highest quality audio. (Note: JDownloader2 can pull much higher quality video and audio downloads compared to yt-dlp/Stacher. Just an FYI.) | 🌐 Website |
| Shutter Encoder | Used to convert AV1 encoded videos to H.624 codec. (It’s a (free) user-friendly app that makes it easier for people who don’t understand how to use command prompt. It gives you check boxes to pick and choose what you need then runs ffmpeg through command prompt.) | 🌐 Website |
| Audacity | Used to sync audio from video with the chart audio and add silence where it’s needed. | 🌐 Website |
| Adobe Premiere Pro | Used to edit video, downscale, add empty space at the beginning or end, etc. Export as webm (VP8). | 🌐 Website |
| ffmpeg | Used for video encoding. | 🌐 Website |
Workflow
Section titled “Workflow”- JDownloader - Video (2160p, 25fps, AV1; 128kbit AAC) at 318MB;
- Shutter Encoder - convert to H.264 (scale: source; default settings; check Max. Quality); conversion maintaining (2160p, 25fps, AV1; 128kbit AAC) with no noticable loss at 521mb
- Audacity - export a copy of chart audio to MP3 (for sync); sync audio from music video to chart audio; export MV audio as OPUS. (MV audio has been better quality 99% of the time.)
- Premiere Pro - import 2160p video to timeline and change sequence settings to 1920x1080, change nothing else; set video in timeline to frame size; sync video to chart audio; add black space to fill beginning and end as needed.
Export Settings
Section titled “Export Settings”- Format: WebM
- Match Source
- Codec: VP8
- Method: Constant Quality
- Quality: 50
- 2-Pass Encoding [ON]
- Max Keyframe Distance: 128
- Include Alpha Channel [OFF]
- Use Maximum Render Quality [ON]
- Render Alpha Channel Only [OFF]
- Time Interpolation: Frame Sampling. | Audio - Codec Opus; Auto bitrate [ON]
- Bitrate (kb/s): 128
318mb > 521mb > 184mb
Section titled “318mb > 521mb > 184mb”I’ve worked on this process for a long time. Lots of trial and error. This has gotten me the best videos at the lowest file size. This is only the process for 4K to 1080p. Lower res may need different settings (maybe not). BG videos don’t need to be higher than 1080p. 720p gets to fuzzy for me which is why I choose 1080p, unless a video is already 720p, then I’ll export at 720p.
🖼️ Image
Section titled “🖼️ Image”Image backgrounds are also supported in the .png format. These may be used in the same folders and circumstances mentioned above.
Credits to NeoN for the content of the video section page. Credits to theKingsy for the video editing tips. Twitter Twitch